Risk Management 101 for Traders: Survive, Protect Capital, and Scale Profitably
Introduction: Why Risk Management Is Your Real Edge
Most traders obsess over entries. Professionals obsess over survival. Your strategy might tell you where opportunity exists, but risk management decides whether you stay solvent long enough for your edge to pay you.
A “good trade” is not a trade that wins. A good trade is a trade where the downside is controlled, the logic is clear, and the execution follows your plan regardless of outcome. In real trading, losses are unavoidable. Blown accounts are avoidable.
If you want to survive and scale, your risk management must answer three questions before every trade:
How much can I lose on this idea?
How many times can I be wrong in a row without damaging my account?
How do I prevent one bad day from becoming a career-ending drawdown?
This guide gives you a complete, professional framework for forex risk management, gold (XAU/USD) risk management, and trading in general.
What Trading Risk Management Actually Means
Trading risk management is the system of rules that controls your downside at multiple levels:
Trade-level risk: stop placement, invalidation, position size, R multiples
Day-level risk: daily loss limits, max trades, news rules, cooldown rules
Portfolio-level risk: total exposure, correlation, concentration, open risk limits
Behavioral risk: revenge trading controls, overtrading prevention, discipline processes
Business-level risk: drawdown thresholds, scaling rules, performance review standards
If your only “risk management” is a stop loss that you move when price gets close, you do not have risk management. You have hope.
The First Principle: Risk Is a Decision, Not a Feeling
Serious traders decide risk first. They do not enter and then “see what happens.”
A professional pre-trade checklist always includes:
1) Invalidation point: where the idea is objectively wrong
2) Stop distance: how far the stop is from entry in pips/points/dollars
3) Risk amount: your fixed risk per trade in currency terms
4) Position size: calculated from risk amount and stop distance
5) Maximum exposure: how many similar bets you already have open
If any of these are missing, the trade is not ready.
The Reality of Drawdowns: Why Survival Comes First
Drawdown is not just a number. It changes the math of recovery.
If you lose 10%, you need 11.1% to recover.
If you lose 20%, you need 25% to recover.
If you lose 50%, you need 100% to recover.
If you lose 70%, you need 233% to recover.
The deeper the drawdown, the more desperate decisions become, and the more likely you are to abandon your process. This is why professional traders design systems to avoid large drawdowns, not just to chase profits.
Risk Per Trade: The Most Important Number in Your System
Risk per trade is the percentage of your account you are willing to lose if the stop is hit.
For most serious traders, a practical range is:
0.25% to 1.0% per trade
If you are still refining your execution, 0.25% to 0.5% is often optimal because it protects your psychology and prevents “damage” while you build consistency.
Here is what risk per trade really controls:
Your maximum drawdown speed
Your ability to survive losing streaks
Your emotional stability during trades
Your long-term compounding potential
If you are emotionally attached to outcomes, your risk is probably too high.
A simple rule that improves almost every trader instantly
If you cannot accept the loss before entering, reduce your risk until you can.
R Multiples: The Professional Language of Performance
To standardize results across different instruments and stop sizes, use R.
1R = your initial risk on the trade
If you risk £100 and lose, that is -1R.
If you risk £100 and make £200, that is +2R.
If you risk £100 and make £50, that is +0.5R.
R multiples allow you to measure your strategy objectively without being distracted by money amounts that change as your account grows.
Expectancy: Why Win Rate Is Not the Goal
Most traders chase a higher win rate. Professionals chase positive expectancy with controlled drawdowns.
A simplified expectancy formula:
Expectancy = (Win rate × Average win) − (Loss rate × Average loss)
Measured in R, the math becomes clean.
Example:
Win rate: 45%
Average win: 2R
Average loss: 1R
Expectancy = (0.45 × 2) − (0.55 × 1)
Expectancy = 0.90 − 0.55
Expectancy = +0.35R per trade
Over 100 trades, that is +35R in expectation. If 1R equals 1% risk, that’s roughly +35% before costs and compounding.
A trader with a 40–50% win rate can be highly profitable if their average win is larger than their average loss. A trader with a 70% win rate can still lose money if they take small wins and large losses.
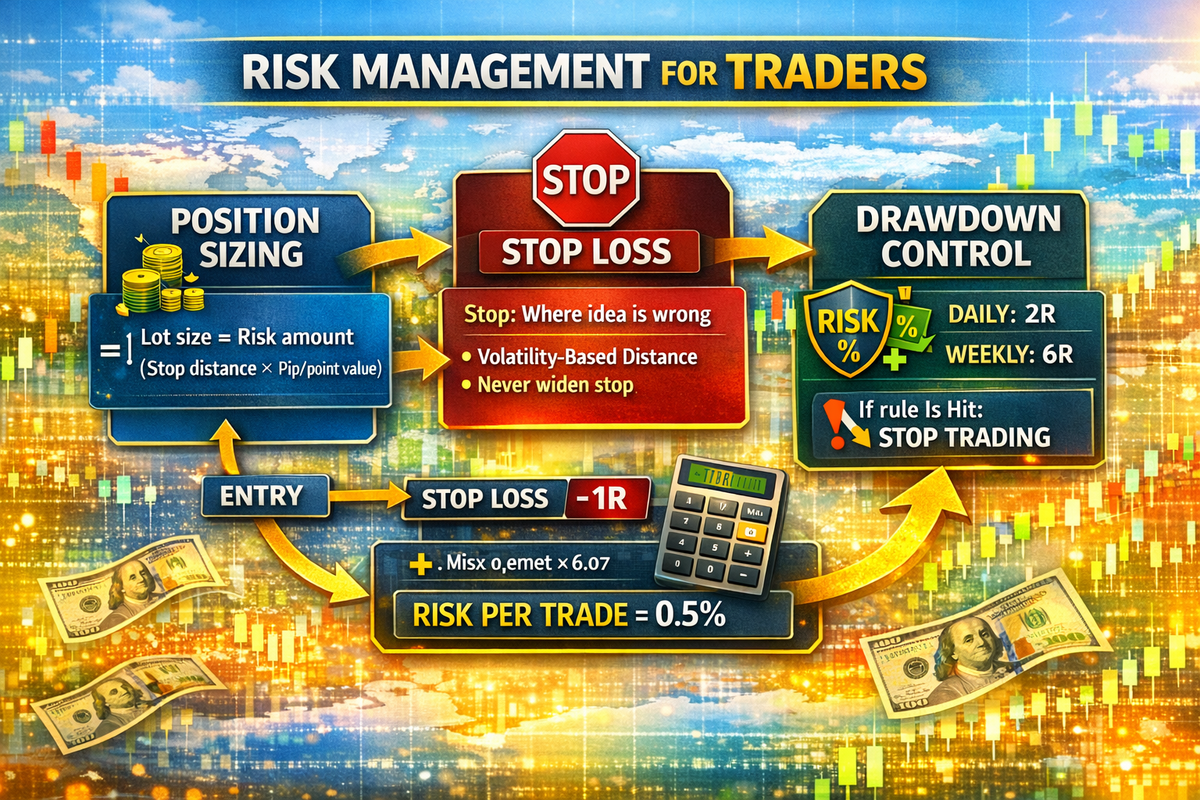
Stop Loss Strategy: Place Stops Where the Idea Is Wrong
A stop loss is not a pain threshold. It is an invalidation point.
Your stop should be placed at the price level where your trade thesis is no longer valid.
Common stop placement mistakes:
Stops based on money, not structure
Stops placed at obvious levels with no buffer
Stops too tight for volatility
Stops moved away when threatened
No stop at all, relying on “manual exit”
Invalidation examples by setup
Trend pullback long: stop below the pullback low and below the structural level that must hold.
Breakout retest long: stop below the retest low or below the breakout level with a buffer.
Range reversal: stop beyond the range extreme plus a volatility-aware buffer.
A serious trader understands that being stopped out is not failure. Being stopped out is the cost of doing business when you are wrong. The failure is allowing one wrong idea to become a large loss.
Volatility-Aware Risk: Why Stops Must Match the Instrument
A 15-pip stop might be fine on EUR/USD in quiet conditions. The same stop can be unrealistic on GBP/USD during London volatility, and it can be completely inappropriate for XAU/USD during a news week.
Volatility dictates stop distance. Risk per trade dictates position size.
This is the professional sequence:
Market volatility → stop distance → position size
The retail sequence is usually the opposite:
Desired profit → position size → forced tight stop
If you force a stop inside normal market noise, you are not “reducing risk.” You are increasing the probability of getting stopped out.
Position Sizing: The Formula That Turns Discipline Into Reality
Position sizing is the bridge between a risk decision and actual execution.
To calculate position size, you need:
Account size
Risk percentage
Stop distance
Pip/point value (or contract value)
A universal principle applies across forex, gold, indices, crypto, and stocks:
Position size = Risk amount ÷ (Stop distance × Value per pip/point)
Forex position sizing example (simplified)
Account: £10,000
Risk per trade: 1%
Risk amount: £100
Stop distance: 25 pips
Value per pip for 1.00 standard lot: assume £8 (varies by pair and account currency)
Position size = 100 ÷ (25 × 8)
Position size = 100 ÷ 200
Position size = 0.50 lots
If stop must be 50 pips due to volatility:
Position size = 100 ÷ (50 × 8)
Position size = 0.25 lots
Same risk. Different stop. Different size. That is how a professional stays consistent.
Gold (XAU/USD) position sizing example (conceptual)
Gold is often quoted in dollars and moves in dollars. Contract specifications vary by broker. The method stays the same.
Account: $20,000
Risk per trade: 0.5%
Risk amount: $100
Stop distance: $8.00
Value per $1 move per contract: depends on contract size
Position size is calculated so that a full stop equals $100 loss. If the stop needs to be wider, you reduce size accordingly.
The key is not the contract detail. The key is the discipline: stop first, size second.
Leverage: Why It Is Not a Strategy, Only a Multiplier
Leverage is not risk management. It is a tool that allows you to take positions larger than your capital. Used correctly, leverage is neutral because your position size is still governed by stop distance and risk per trade. Used incorrectly, leverage accelerates account destruction.
A serious mindset:
Ignore leverage availability. Focus on risk per trade.
If you size correctly, you could have 1:30 or 1:500 leverage and your risk remains controlled. If you size incorrectly, even 1:10 leverage can wipe you out.
Maximum Open Risk: Stop Losing More Than You Planned
One of the most overlooked risk rules is maximum open risk, meaning the total risk across all open trades if every stop is hit.
A common professional guideline:
Max open risk: 1.5% to 3% of account
Example:
If you risk 0.5% per trade, you may allow up to 3–5 open positions only if they are not highly correlated and only if the combined risk remains within your cap.
If you risk 1% per trade, holding 5 trades is often reckless unless they are truly independent and your system is designed for it.
Correlation Risk: The Hidden Risk That Blows Accounts
Correlation is how multiple positions can effectively become one large bet.
If you are long EUR/USD and long GBP/USD, you are likely long USD weakness twice. If you are also long XAU/USD, you may be reinforcing the same macro theme. When the USD reverses, you can lose on all positions simultaneously.
A professional treats correlated trades as a single exposure bucket.
Practical correlation rules
Limit “same theme” exposure: do not stack trades that all depend on USD weakness or risk-on sentiment.
Cap currency exposure: avoid having multiple positions where one currency is the common driver.
Reduce size when stacking: if you insist on multiple correlated trades, reduce risk per trade so combined exposure stays within your max open risk.
Prefer uncorrelated setups: diversify across different drivers when possible.
Correlation is not about being clever. It is about preventing one narrative shift from hitting all positions at once.
Daily Loss Limits: The Rule That Prevents Revenge Trading
A daily loss limit is a hard stop that ends your trading day when reached. It is a protective barrier against emotional spirals and bad market conditions.
A common model:
Daily loss limit: 2R or 3R
If you risk 0.5% per trade and set a daily limit of 2R, your maximum daily loss is about 1%. That protects you from a single day doing disproportionate damage.
Your daily loss limit should be paired with a behavior rule:
If daily loss limit is hit, stop trading immediately. No exceptions.
Weekly Loss Limits: Protection Against Regime Changes
Markets shift. Your strategy can underperform during certain regimes. A weekly loss limit prevents you from forcing trades in conditions that do not suit your edge.
A common model:
Weekly loss limit: 5R to 8R
If hit, you reduce risk, reduce frequency, or pause trading and review. This is not weakness. It is professional control.
Trade Frequency: Overtrading Is a Risk Problem
Overtrading increases:
transaction costs (spread, commission, slippage)
exposure to randomness
decision fatigue
emotional mistakes
A professional controls frequency by:
trading only A-grade setups
limiting trades per session
using time windows
avoiding boredom trades
A practical rule:
Max trades per session: 1 to 3
If you need 10 trades a day to feel productive, you are optimizing for activity, not profit.
News and Event Risk: Know When Your Edge Disappears
Major economic releases can create volatility spikes that invalidate normal technical behavior. This matters greatly for XAU/USD and USD pairs.
Risk management around news can take two professional forms:
Avoidance approach: no new positions shortly before and after major releases; trade post-news structure instead.
Structured volatility approach: dedicated strategy designed for news conditions with wider stops, smaller size, and strict acceptance rules.
The mistake is mixing both. If you do not have a tested volatility strategy, default to avoidance.
Trade Management Risk: The Exit Is Part of Risk Management
Risk management does not end when you enter. Poor management can turn winners into losers or create inconsistent results.
Professional trade management is rule-based, not emotional.
Two common models:
All-in all-out: one stop, one target, clear statistics, low decision fatigue.
Scale-out: partial profit at predefined levels, manage runner with rules.
Choose one and stick to it for a full sample. Switching models destroys the clarity of your data.
The breakeven trap
Moving stops to breakeven too early often kills profitability because normal market pullbacks stop you out before the real move.
A better rule:
Move to breakeven only after a structural confirmation in your favor, such as a higher low formed above entry on a long, or after price achieves at least 1R and shows acceptance above a key level.
Psychological Risk: If Your Risk Is Too High, Your Rules Won’t Matter
Most “psychology problems” are actually position sizing problems.
Signs your risk is too high:
you watch every tick
you close early to “lock something in”
you move stops
you revenge trade
you double down after losses
you avoid taking the next valid setup
The fix is not motivational quotes. The fix is reducing risk until you can execute without emotional interference.
A professional rule:
If you break a risk rule, stop trading for the day. This trains discipline faster than any book.
A Complete Risk Management Plan (Template You Can Use Today)
Below is a risk plan you can adapt. The power is in writing it down and enforcing it.
Risk per trade: 0.5%
Max open risk: 2%
Max daily loss: 2R
Max weekly loss: 6R
Max trades per session: 2
Sessions traded: London first 2 hours and NY first 2 hours
News rule: no new trades 10 minutes before and 15 minutes after high-impact events
Correlation rule: no more than two positions sharing the same currency theme
Scaling rule: increase risk only after 30 trades with positive expectancy and no rule breaches
Cooldown rule: after 2 consecutive losses, pause for 30 minutes and re-check market regime
Hard rule: if a stop is placed, it is never moved wider
This plan is intentionally conservative. Conservatism is how you earn the right to scale.
How to Scale Safely Without Blowing Up
Scaling is not “increase lot size because you’re confident.” Scaling is a structured process.
A professional scaling ladder:
Step 1: Prove execution discipline at low risk (0.25%–0.5%) for at least 30–50 trades
Step 2: Confirm positive expectancy after costs and realistic slippage
Step 3: Increase risk slightly (for example from 0.5% to 0.75%) only if rule compliance stays perfect
Step 4: Increase size only after another validated sample
Step 5: Reduce risk immediately after a drawdown threshold is hit
A key point:
Scaling should be based on statistics and discipline, not on “feeling in sync with the market.”
Trading Journal Metrics That Improve Risk Management Fast
Your journal should track not only outcomes, but also risk behavior.
Minimum risk-related journal fields:
Setup type
Stop distance
Risk in R
Result in R
Max adverse excursion (MAE): how far price went against you
Max favorable excursion (MFE): how far price went in your favor
Rule compliance score (Yes/No)
Mistake tags (moved stop, early exit, overtraded, news violation, etc.)
MAE and MFE are powerful because they reveal whether your stops are too tight or whether your targets are unrealistic.
Common Risk Management Mistakes That Kill Traders
Risking more after losses to “make it back”
Fix: daily loss limit and cooldown rule
Moving stops wider
Fix: pre-commitment rule that stops are never widened
Tight stops on volatile instruments
Fix: volatility-aware stop placement, then reduce size
Stacking correlated positions
Fix: exposure caps and correlation rules
No maximum open risk
Fix: set a hard cap and treat it as non-negotiable
Basing size on confidence instead of math
Fix: always calculate position size from risk amount and stop distance
Frequently Asked Questions
What is the best risk percentage per trade for forex and gold?
For most traders, 0.25% to 1% per trade is a professional range. If you are still learning or emotional, 0.25% to 0.5%often yields better long-term performance because you protect decision quality.
Is a stop loss always required?
For serious trading, yes. Without a stop-loss or a defined exit that is executed consistently, your downside can become unlimited during shocks, slippage events, or platform issues.
Why do I keep getting stopped out and then price goes my way?
Most often it is because the stop is placed inside normal volatility or at an obvious level without buffer. Use structural invalidation and volatility-aware distance, then size down to keep risk constant.
How do I manage risk when trading multiple pairs?
Set a maximum open risk limit and a correlation rule so you do not accidentally create one oversized bet across several positions.
Can I scale faster by increasing leverage?
Leverage does not create edge. Scaling faster by increasing leverage usually increases drawdown and emotional error. Scale only after validated performance.
Conclusion: Risk Management Is the Strategy
Your strategy finds opportunity. Risk management keeps you alive. Survival comes first because it is the only requirement that makes everything else possible.
If you adopt nothing else from this guide, adopt these non-negotiables:
Define invalidation before entry
Size positions from risk, not emotion
Use R multiples to measure performance
Limit daily and weekly losses
Control correlation and maximum open risk
Scale only after validated discipline and expectancy

Comments ()