Forex Trading for Serious Traders: A Complete Framework (From Setup to Execution)
What “Serious Trading” Actually Means
A serious trader is not defined by lot size, number of indicators, or how often they trade. Serious trading is defined by:
- A repeatable process (same preparation, same entry logic, same risk rules)
- Defined risk (every trade has an invalidation point and a position size derived from it)
- Measured performance (journal, stats, review cycle)
- Professional behavior (no revenge trading, no random “feels like it” entries)
- Long-term survivability (protect capital first; scale second)
The goal is not to be right. The goal is to execute a plan where your edge plus risk control creates positive expectancy over a large sample of trades.
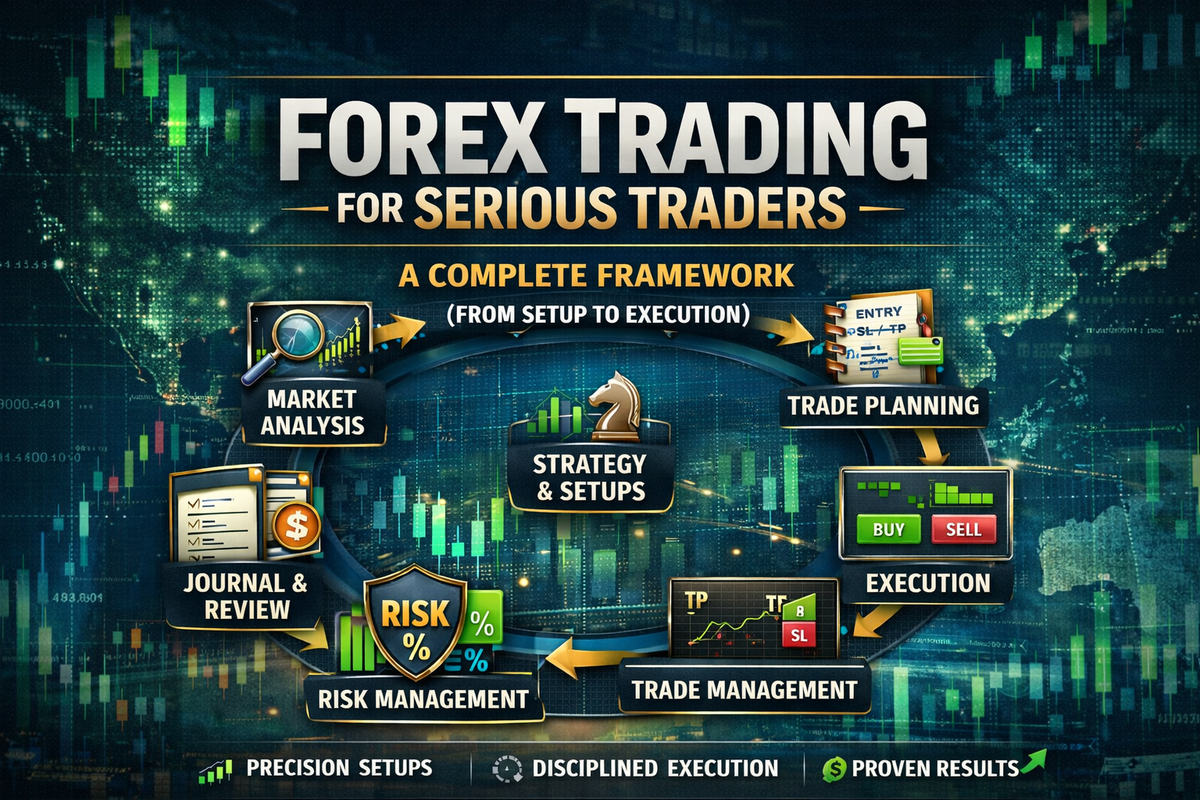
The Framework at a Glance (Setup → Execution → Review)
Think of this as a closed-loop system:
- Foundation (broker, platform, instruments, risk policy, rules)
- Market Understanding (sessions, volatility, catalysts, regime)
- Strategy & Playbook (setups you trade and only those setups)
- Trade Planning (bias, levels, scenarios, triggers, invalidation)
- Execution (orders, sizing, discipline, managing emotion)
- Trade Management (stop logic, profit-taking, trailing, exits)
- Journaling & Review (metrics, mistakes, improvements)
- Iteration (refine rules, retest, forward-test)
If you skip the last two, you remain stuck at “random results.”
1) Foundation: Build a Trading Business, Not a Hobby
1.1 Choose Your Trading Style (Before You Choose a Strategy)
Your style determines everything: timeframes, holding period, sessions, and risk.
Common styles (with realistic demands):
- Swing trading (H4/D1): fewer decisions, more patience, overnight risk
- Day trading (M15/H1): more decisions, needs strict routine
- Intraday scalping (M1/M5): execution-heavy, psychologically demanding, spread-sensitive
If you have a day job, swing or day trading with structured windows is often more sustainable than scalping.
1.2 Pick a Small Instrument Universe
Serious traders don’t watch 30 pairs. They master a few.
A strong starter basket:
- EUR/USD (liquid, structured)
- GBP/USD (volatile, great moves, can be noisy)
- USD/JPY (rate-sensitive, trend-friendly at times)
- XAU/USD (if you also trade gold; high volatility; needs wider stops)
Why limit instruments?
- You learn each market’s “personality”: how it moves during London, how it behaves around news, how it respects levels.
1.3 Know Your Costs (They Matter More Than You Think)
Trading costs are a “hidden tax” on your edge:
- Spread
- Commission
- Slippage (especially around news)
- Swap/rollover (for swing positions)
A “good strategy” can become unprofitable if it trades too frequently with tight targets and high costs.
1.4 Define Your Risk Policy (Non-Negotiable)
A serious trader has written risk limits. Example risk policy:
- Risk per trade: 0.25%–1.0% of account (pick one and be consistent)
- Max risk open at once: 2% (e.g., two trades at 1% each)
- Max daily loss: 2R (or 2% if R=1%)
- Max weekly loss: 5R
- Stop trading after: 3 consecutive losses (cooldown rule)
- No trading during major red-news minutes: e.g., 5–10 min before/after (depending on strategy)
This is not “restrictive.” This is what keeps you alive long enough to scale.
2) Market Understanding: What Moves FX (and When)
Forex is a relative pricing market. Currencies move because capital flows change based on:
- Interest rate expectations (central banks, yields)
- Inflation & growth data
- Risk sentiment (risk-on/off)
- Geopolitics and shocks
- Positioning and liquidity
2.1 Sessions and Liquidity (Timing Is a Strategy)
- Asia session: often range-bound for many pairs (not always)
- London session: strongest liquidity for EUR/GBP crosses; frequent trend formation
- New York session: US data, USD flows; continuation or reversal
A serious trader knows:
- which session they trade
- which instruments behave best in that session
- what time window they will not trade
2.2 Volatility Regimes (Your Strategy Must Fit the Regime)
Two broad regimes:
- Trending regime: pullbacks work, breakouts follow through
- Ranging regime: mean reversion works, breakouts fail more often
A common reason traders lose: they apply a trend strategy in a range or a range strategy in a trend—then blame the strategy.
Practical regime filters (simple):
- Price relative to a higher timeframe structure (e.g., D1/H4 swing highs/lows)
- ATR (Average True Range): rising ATR supports trends and expansions
- Market structure: higher highs/higher lows = trend; repeated rejections = range
3) Strategy & Playbook: Trade Fewer Setups, Perfect the Execution
A “strategy” is not an indicator. It’s a complete rule set:
- Market conditions required
- Entry trigger
- Invalidation point
- Stop placement rule
- Position sizing rule
- Profit-taking rule
- Trade management rule
- When not to trade
3.1 Build a Playbook (Your Personal “Approved Trades”)
Your playbook is a small set of setups you execute repeatedly. Example playbook (3 setups maximum to start):
- Trend Pullback Continuation
- Breakout + Retest
- Range Reversal at Extremes
Each setup should have:
- a diagram (what it looks like)
- criteria checklist
- “A+ conditions” vs “B trades”
- examples (screenshots if you publish on your site)
4) Trade Planning: Bias, Levels, and Scenarios
Serious traders plan scenarios, not predictions.
4.1 Top-Down Process (Practical Version)
- Weekly/Daily: identify major swing structure
- H4/H1: define current trend/range and key zones
- M15/M5: find entry triggers aligned with the plan
Key tools (keep it simple):
- Swing highs/lows
- Support/resistance zones (not single lines)
- Trendline only if it’s obvious and respected
- ATR for stop/target realism
4.2 Define Key Levels (Where Decisions Will Happen)
Levels matter because institutions and large players act around:
- prior day high/low
- weekly high/low
- major swing points
- round numbers (not magic, but often watched)
- obvious liquidity pools (clusters of stops beyond highs/lows)
A serious trader marks these levels before the session starts.
4.3 The Two-Scenario Plan (Professional Standard)
For every instrument you trade, write:
- Scenario A (Primary): “If price does X, I will look for Y setup.”
- Scenario B (Alternative): “If price does Z instead, I will do W or stand aside.”
This prevents emotional decision-making mid-session.
5) Execution: Entries, Orders, and Position Sizing (The Core)
5.1 Invalidation Comes First, Entry Comes Second
Before you enter, you must know:
- Where your idea is wrong
- How much you will lose if wrong
- Whether that loss fits your risk policy
If you can’t define invalidation, you are gambling.
5.2 Stop Placement (Logic, Not Emotion)
Good stops are placed where the setup is invalidated, not where it “feels safe.”
Examples:
- For a trend pullback long: stop below the pullback low and below the structure that must hold
- For breakout retest: stop below retest support zone (or above for shorts)
- For range reversal: stop beyond the range extreme plus a buffer (often ATR-informed)
5.3 Position Sizing (The Formula That Makes You Professional)
Position size is derived from:
- account size
- risk %
- stop distance (in pips)
- pip value
Step-by-step example (hypothetical):
- Account: £10,000
- Risk per trade: 1% = £100
- Stop: 25 pips
- Value per pip (assume £8 per pip for 1 standard lot on that pair; varies)
Position size ≈ Risk ÷ (Stop pips × pip value per lot)
= 100 ÷ (25 × 8)
= 100 ÷ 200
= 0.50 lots
If stop distance must be wider (say 50 pips), size shrinks:
= 100 ÷ (50 × 8) = 0.25 lots
This is how you maintain consistent risk and avoid “random” drawdowns.
5.4 Order Types (Use the Right Tool)
- Market order: certainty of entry, less control on price (slippage risk)
- Limit order: precision, but you may miss the trade
- Stop order: entry only if momentum confirms (breakouts)
Serious traders choose based on setup logic, not habit.
6) Trade Management: Stops, Targets, and Exits
Your entry is only the beginning. Most traders lose money through poor management.
6.1 Use R-Multiples to Standardize Performance
Define R as your initial risk.
- Risk £100 = 1R
- If you make £200 = +2R
- If you lose £100 = -1R
This allows you to compare trades objectively across different stop sizes and instruments.
6.2 Targets: Structural or Statistical
Good target types:
- Next major resistance/support zone
- Measured move (range height, impulse leg)
- ATR-based target (realistic range)
Avoid random targets like “I’ll take profit at 10 pips” unless you have evidence that it works after costs.
6.3 Partial Profits vs Full Exits (Be Consistent)
Two common approaches:
Approach A: Scale out
- Take 50% at +1R
- Move stop to entry (or reduce risk)
- Let remainder aim for +2R to +3R
Approach B: All-in/all-out
- Take full exit at a planned target
- Cleaner statistics, less decision fatigue
Pick one approach for a full testing cycle. Switching midstream destroys your data.
6.4 Stop to Breakeven: Use Rules, Not Fear
Moving to breakeven too early is a common profit killer.
Rule-based alternatives:
- Move to breakeven only after a structure break
- Or after price reaches +1R and forms a new higher low (for longs)
7) Examples: From Setup to Execution (Two Full Walkthroughs)
Example 1: Trend Pullback Continuation (Day Trade)
Context (hypothetical):
- H1 shows higher highs/higher lows (trend up)
- Price pulls back into a prior support zone
- London session begins; volatility increases
Plan:
- Scenario A: If price holds support and prints bullish confirmation, enter long.
- Scenario B: If support breaks and closes below, no long; reassess for short or stand aside.
Entry trigger options (choose one):
- Break of a minor lower-high on M15 after pullback
- Bullish engulfing + close above pullback structure
- Reclaim of a key intraday level
Invalidation:
- Below pullback low + buffer
Risk:
- Account £10,000; risk 0.5% = £50
- Stop 20 pips → position size derived by formula
Targets:
- Target 1 at prior intraday high (+1R to +1.5R)
- Target 2 at next resistance zone (+2R)
Trade management:
- If price reaches +1R and forms a higher low, tighten stop under that higher low.
- If price stalls at resistance with rejection, consider full exit (rule-based).
This is a complete trade: context → plan → trigger → invalidation → sizing → management.
Example 2: Breakout + Retest (Swing Trade)
Context (hypothetical):
- Daily range for multiple days (compression)
- Breakout above range high occurs with strong close
- You wait for retest of the breakout zone
Plan:
- Only enter on retest hold (avoid chasing the first candle)
Entry:
- Limit order at retest zone or confirmation candle on H4
Invalidation:
- Daily close back inside the range (or stop below retest low)
Risk:
- Risk per trade 1%
- Stop wider (e.g., 80 pips), position size smaller (professional behavior)
Target:
- Range height projection or next weekly resistance
Key discipline point:
Most traders chase breakouts. Serious traders wait for the market to prove acceptance above the level.
8) The Serious Trader’s Routine (Daily, Weekly, Monthly)
8.1 Daily Routine (30–60 minutes)
- Scan calendar for major events (know when volatility spikes)
- Mark key levels: prior day high/low, major zones
- Decide session window: e.g., first 2–3 hours of London
- Write your two-scenario plan
- Execute only A+ setups
- Journal immediately after each trade
8.2 Weekly Review (Non-Negotiable)
- Export trades
- Calculate:
- win rate
- average R
- expectancy
- max drawdown
- best/worst session performance
- mistakes frequency
Then answer:
- What worked?
- What failed?
- What was avoidable (rule breaks)?
- What rule change (if any) is justified by data?
8.3 Monthly “System Upgrade” Review
- Identify your highest expectancy setup(s)
- Remove low-quality trades and time windows
- Update playbook examples
- Retest if you modify rules
9) Journaling: The Difference Between Amateurs and Professionals
A serious journal includes both numbers and psychology.
Minimum journal fields:
- Pair
- Date/time, session
- Setup type (from playbook)
- Timeframes aligned? (Y/N)
- Entry reason (bullet points)
- Stop reason (invalidation)
- Risk (R)
- Result (R)
- Screenshot before/after
- Mistakes (if any)
- Emotion rating (1–10)
- Lesson / rule reinforcement
Over time, you’ll see patterns:
- You lose more when trading outside your session window
- You win more on one setup than the others
- Certain news events create conditions your strategy hates
That is how you evolve systematically.
10) Backtesting and Validation (So You Stop “Hoping”)
10.1 What You’re Trying to Prove
You are not trying to prove you can predict the market. You are trying to prove:
- Your setup has a statistical edge
- Your execution rules preserve that edge
- Costs don’t destroy profitability
- The edge persists across different market periods (not just one month)
10.2 A Practical Testing Ladder
- Backtest (historical) for structure: does it make sense?
- Forward test (demo or micro) for execution realism
- Small capital phase with strict limits
- Scale slowly only after consistency
Avoid “strategy hopping.” Most traders never reach a meaningful sample size.
11) Psychology: Serious Traders Engineer Their Behavior
Professional execution is emotional regulation plus rules.
Three principles that work:
- Pre-commitment: write the plan before volatility hits
- Checklists: reduce decision fatigue
- Cooldown rules: prevent revenge trading
Simple but powerful rule:
If you break a rule, you stop trading for the day.
This trains your identity as a professional.
12) Common Failure Points (And How to Fix Them)
“My strategy works, but I still lose.”
Usually caused by:
- inconsistent risk per trade
- moving stops
- entering without invalidation
- overtrading outside your plan
- trading during volatility spikes unsuited to the strategy
Fix:
- lock risk policy
- use checklists
- reduce setups to 1–2
- build a review loop
“I keep getting stopped out before price goes my way.”
Possible causes:
- stop too tight for volatility (ATR mismatch)
- entering in the middle of ranges
- using lower timeframe noise as confirmation
Fix:
- widen stop to structure and reduce size
- improve level selection
- align with higher timeframe bias
“I can’t hold winners.”
Fix:
- use partials or trailing rules
- decide management approach before entering
- measure outcomes in R, not money
13) Practical Checklists (Copy/Paste)
Pre-Trade Checklist
- Is this an approved playbook setup?
- What is the higher timeframe context?
- What are the key levels nearby?
- What is my invalidation point?
- What is my stop distance and position size?
- What is my target and why?
- What is the event risk in the next hour?
- Am I within my session window?
- Am I calm enough to execute?
Post-Trade Checklist
- Did I follow the rules?
- If not, which rule broke and why?
- Was the setup valid but outcome negative? (That’s normal.)
- What would I do differently next time?
Closing: The “Serious Trader” Standard
If you want consistency, you must treat trading as a system:
- Plan (scenarios, levels, triggers)
- Execute (rules, sizing, discipline)
- Review (data, mistakes, improvements)
- Repeat (sample size wins)
At Investment Trading Hub Academy, the goal is to train traders to operate like professionals: fewer trades, higher quality decisions, controlled risk, and continuous improvement.

Comments ()